


Turning Simple Ingredients into Edible Art
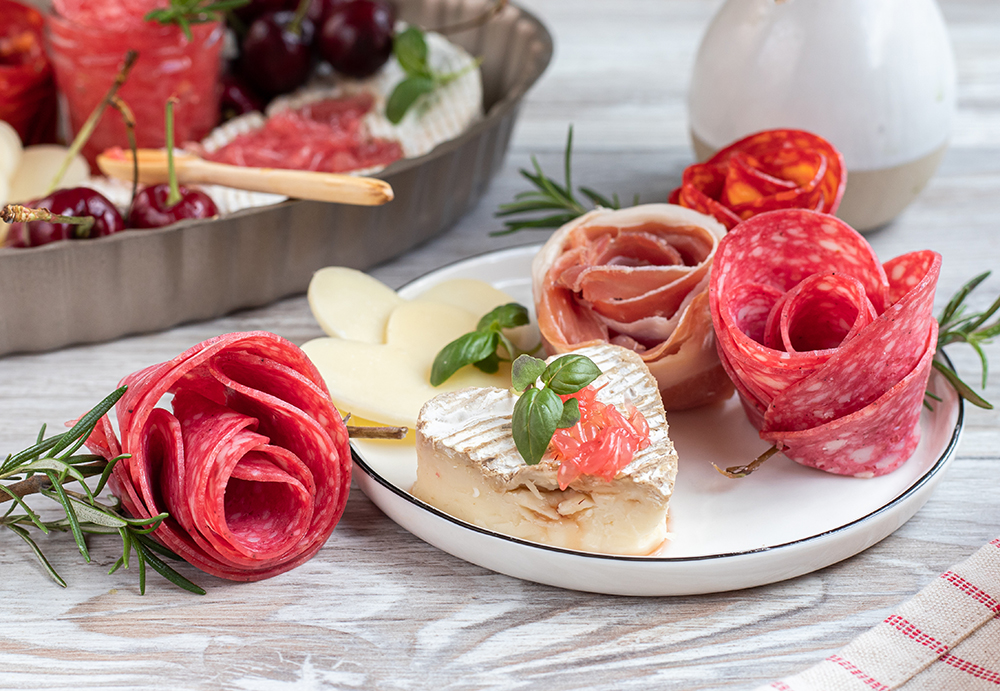
A charcuterie board is more than a collection of meats and cheeses; it is a visual experience that invites people to gather, admire, and indulge. While flavor always comes first, presentation has a powerful psychological effect on how food is perceived. A thoughtfully arranged board signals care, creativity, and celebration before a single bite is taken. Among the most eye-catching techniques in modern food styling is the meat rose—a simple yet elegant design created by folding and layering thin slices into the shape of a blooming flower. What makes this technique so appealing is that it requires no special equipment, only patience, symmetry, and a bit of artistic intention. With a few mindful steps, everyday deli meats can be transformed into a centerpiece that elevates the entire spread.
Choosing the Right Meats
The best roses begin with the right texture. Thinly sliced meats such as salami, pepperoni, prosciutto, or turkey work especially well because they are flexible and easy to fold without tearing. Slightly firmer meats hold their shape better, while very delicate slices may require gentle handling. Uniform, round slices create the most realistic petals, though irregular cuts can produce a more rustic bloom. Freshness also matters, as overly dry slices are less pliable and more prone to cracking.
The Basic Folding Technique
Creating a meat rose starts by overlapping slices in a straight line, with each piece covering roughly one third of the previous one. Once layered, the row is carefully folded in half lengthwise, forming a long strip with rounded edges exposed. Starting at one end, the strip is rolled tightly to form the center of the rose. As the roll expands outward, the layered edges naturally resemble petals unfurling. The final shape can be adjusted gently to create a fuller, more open bloom.
Using Glassware for Structure
For a perfectly symmetrical rose, a small glass can serve as a helpful guide. Slices are draped along the rim of the glass in overlapping layers until a full circle is formed. Additional layers can be added for volume. Once complete, the glass is inverted onto the serving board and lifted carefully, revealing a neatly structured rose. This method provides extra support and is especially useful when working with softer meats.
Placement and Presentation
A meat rose works best as a focal point. Placing it in the center of the board draws the eye immediately and creates a sense of balance. Surrounding the rose with contrasting colors—such as pale cheeses, dark olives, bright fruits, or fresh herbs—enhances its visual impact. Spacing is important; giving the rose room to “bloom” prevents the board from feeling crowded. Presentation is ultimately about harmony between color, texture, and height.
Adding Creative Variations
Once the basic technique is mastered, variations can add depth and personality. Combining two types of meat in alternating layers produces subtle color gradients. Looser rolling creates a fully opened blossom, while tighter rolls resemble rosebuds. Garnishing with rosemary sprigs or edible flowers can heighten the illusion of a floral arrangement. With practice, each rose becomes more refined and expressive.
Elevating the Everyday
Transforming sliced meats into roses demonstrates how small details can dramatically elevate a simple dish. The technique blends craftsmanship with creativity, proving that food styling does not require professional tools—only thoughtful execution. When guests pause to admire the board before serving themselves, the effort has already paid off. In the end, the beauty of a meat rose lies not just in its shape, but in the care behind its creation.


 ';
';


